

Category B: Better Body Position
Welcome to AFF Category B! Having passed your Category A (Awareness) jump, this stage is all about building on that foundation: refining your body position, strengthening your altitude awareness habits, and developing the canopy control skills needed to stay safely within your designated holding area.
While your first AFF jump focused on awareness and survival, Cat-B introduces you to the fundamentals of freefall maneuvers and parachute flight dynamics that you'll use for the rest of your skydiving career.
What You'll Demonstrate in Category B
- Maintain heading awareness using a fixed reference point on the horizon
- Demonstrate a stable, relaxed body position throughout freefall
- Perform 3 practice touches
- Respond correctly to instructor signals
- Possibly begin basic freefall maneuvers: forward movement and 90° turns
- Maintain your canopy within the designated holding area
- Execute a safe, straight-in final approach and landing
Section 1: Exit and Freefall
In freefall, your most important task is recognizing and acting at your assigned altitude. To stay aware, stable, and in control, use this mantra:
“Heading, Altitude, Arch, Legs, Relax.”
This simple sequence helps you stay focused on the key elements of your body position and heading awareness while checking your altitude every 5 seconds. For your heading, choose a unique reference point far out on the horizon. This allows you to quickly notice if you are turning and make precise adjustments.
Introducing Basic Freefall Maneuvers (Bonus Skills!):
While your primary focus in the initial freefall portion is to demonstrate continued awareness and a solid, stable body position, you'll also begin to explore basic freefall maneuvers. All of these maneuvers are performed as a team with your instructors, requiring larger inputs than if flying solo. However, these are still exciting steps towards becoming a dynamic freefaller!
Moving Forward: To generate forward movement, smoothly extend your legs completely, keeping your toes pointed. Maintain your arms in a neutral, relaxed position. This adjustment allows you to move forward across the sky.
Making a 90° Turn: To execute a controlled 90° turn, begin by looking over your shoulder in the direction you wish to turn and find a new heading reference point. Then, smoothly lower the elbow on the side you want to turn towards, while raising the opposite elbow. As your new heading comes into view, smoothly return your body to a neutral position to stop the turn.
Section 2: Parachute Flight
Under canopy, safe and predictable flight is just as important as in freefall.
Look Before You Turn: Always look in the direction you want to turn (sweep from eye-level to just below your feet) before initiating any turns to prevent mid-air collisions. This is how you avoid mid-air collisions. Every time.
Straight-In Final: Your final approach to landing should be a straight-in without S-turns. S-turns on final make you unpredictable to other traffic and introduce unnecessary variables at a low altitude.
Prepare for Landing: Even the most experienced skydivers have hard landings at some point. The PLF (Parachute Landing Fall) helps distribute the force of an unexpected hard landing and significantly reduces your risk of injury.
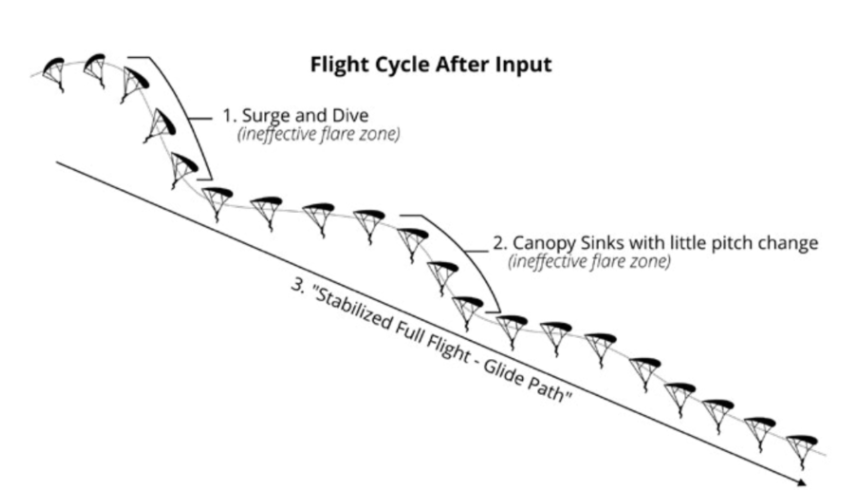
Understanding the Parachute Flight Cycle:
A fundamental characteristic of all parachutes is the "flight cycle" – the parachute's predictable response between an input (like pulling a toggle) and its return to stabilized full flight. To understand this, think of it like a swing coming to rest. When you push a swing, it goes forward, then slows, then swings back, slows again, and eventually settles. Your parachute behaves similarly.
Any input to a canopy, such as turning or pulling down the toggles and letting them back up, initiates this flight cycle. When a flight cycle occurs, the parachute first dives and its speed increases beyond that of its stable full flight (like the swing going forward). As this happens, the jumper swings backward relative to the parachute. The parachute then slows down as the jumper swings forward underneath it. It only takes about 4-8 seconds for a parachute to regain its normal flight characteristics and return to full, stable flight (like the swing slowing and settling back to center). While experiencing a flight cycle at higher altitudes can be fun and instructive, a flight cycle just before or during your flare is extremely dangerous.
Common Student Scenario: "I Flared Too High — Now What?"
It happens to almost every student at some point. You initiate your flare, realize you're still 10-15 feet up, and panic sets in. Here's what to do:
- Stop and hold. Freeze your toggles exactly where they are. Do not let them back up.
- Wait. You'll descend through the remaining altitude. It may feel like forever, but it's only a few seconds.
- Finish strong. When you're closer to the ground, complete the flare by bringing your toggles the rest of the way down.
- Prepare for a PLF. A flare initiated too high often results in a harder landing. Feet and knees together, be ready to roll.
Remember: flaring is a one-way street. You can stop pulling down at any point if you started too high, but you cannot let the toggles back up. The instinct is to release and "try again" — but this initiates a flight cycle at the worst possible moment, causing the canopy to dive and dramatically increasing your landing speed.
Section 3: Emergency Procedures
Your emergency procedures need to be automatic. Practice them on the ground, visualize them before every jump, and know your pull priorities cold.
Pull Priorities: Order of Importance
You learned your Pull Priorities during your First Jump Course — and there's a reason we keep coming back to them. These rules govern every deployment you'll ever make. Here's a quick refresher to keep them sharp.
Your Pull Priorities (In Order of Importance - Review):
PULL: Above all else, you must initiate your deployment.
PULL AT THE CORRECT ALTITUDE: Altitude awareness is essential.
PULL AT THE CORRECT ALTITUDE WHILE STABLE: While stability is always the goal, remember that Pulling and Pulling at the Correct Altitude take precedence. If you find yourself at your pull altitude but momentarily unstable, you still pull without hesitation!
Section 4: Parachute Malfunction Review
After deployment, assess your canopy by asking yourself three questions — always in this order:
Canopy Check
Is it there (parachute fabric)?
Is it square (fully inflated and symmetrical)?
Is it controllable/steerable (turns and flares with toggle input)?
If your canopy fails any of these tests, you must be prepared to act decisively.
Note: While we've given the various names of the malfunctions, your immediate priority is not to memorize them. At this stage, it's crucial to understand how to apply the 3-question Canopy Check (Is it there? Is it square? Is it controllable?) and then decisively follow emergency procedures if any answer is "No."
Canopy Fails the First Test: IS IT THERE?
These scenarios indicate a problem with the initial deployment or the presence of the main canopy.
Hard Pull/No Pull: If you cannot locate your pilot chute handle or it doesn't budge, make no more than two additional, yet methodical attempts (roughly 2 seconds total) to locate and pull. If still unsuccessful, immediately initiate your emergency procedures (cutaway and deploy reserve).
Pilot Chute Hesitation: If you deploy your pilot chute but it appears stuck in your burble (the turbulent air behind your body), check over each shoulder to change the airflow and allow for activation to proceed. This can often resolve itself quickly.
Pilot Chute in Tow: If you can clearly see an inflated pilot chute, but your main canopy has not deployed, immediately initiate your emergency procedures.
Bag Lock: If you see the deployment bag and pilot chute but no canopy, immediately initiate your emergency procedures.
Horseshoe/Premature Deployment: If you notice your deployment bag outside your rig before you've initiated deployment, attempt to locate your pilot chute handle (two tries in 2 seconds). If you cannot locate it or deployment doesn't proceed, immediately initiate emergency procedures.
Canopy Fails the Second Test: IS IT SQUARE?
These issues affect the shape and full inflation of your canopy.
Hung Slider: The slider remains near the canopy's top, impeding full inflation. Wait no more than two seconds to see if the slider descends. If the canopy does not inflate further, immediately initiate your emergency procedures.
Line Over: Your canopy is asymmetrical, often turning on its own due to a line being over a cell. This is typically a non-recoverable malfunction. Immediately initiate emergency procedures.
Canopy Fails the Third Test: IS IT STEERABLE?
These problems relate to the functionality and control of your canopy, even if it appears otherwise inflated. Your altitude awareness is critical here.
Major Canopy Damage: After performing a controllability check (gentle toggle input), if you cannot effectively control the canopy (e.g., it doesn't respond to steering, spins uncontrollably), immediately initiate emergency procedures. Furthermore, if you observe two or more broken lines, a broken steering line, or damage to the parachute fabric larger than your head, even if the parachute appears to be controllable, you should still perform your emergency procedures in case more damage occurs during your descent.
Stuck Slider: If the slider won't come down fully and is impeding complete inflation, release your brakes and gently pump the toggles until the slider descends completely. If the slider still won't come down and you cannot establish full control of the canopy by 2500 feet, immediately initiate your emergency procedures.
End Cell Closure: If one or both end cells are not completely inflated, release your brakes and hold the toggles at hip level until they inflate. Repeat if necessary. If the canopy is still not controllable by 2500 feet, immediately initiate your emergency procedures.
Line Twists: Pull your risers apart and perform a bicycle kick motion to untwist your lines before releasing your brakes. This is a common and often recoverable problem. If you do not have a fully steerable canopy by 2500 feet, immediately initiate your emergency procedures.
Section 5: Basic Safety Requirements (BSRs)
As you gain independence, you'll need to know the USPA Basic Safety Requirements (BSRs). These aren't suggestions — they're the rules every skydiver follows.
Wind Limits: Students may not jump when the surface winds are greater than 14 mph. You should always check the wind conditions at the dropzone with your instructor before preparing for a jump.
Sunset Landing: All student jumps must be completed (feet on the ground) by official sunset. Safety is reduced significantly in low light conditions.
Container Open Altitude: All students and A-license holders must have their container open by 3000 feet AGL (Above Ground Level). This ensures sufficient altitude for problem-solving and reserve deployment.
Landing Area Clearances: Solo students and A-license holders should have a landing area with a minimum radial distance of 100 meters (330 feet) to the nearest hazard.
Identifying Hazards:
Common hazards to be aware of include: telephone and power lines, towers, buildings, open bodies of water, highways, vehicles, and clusters of trees covering more than 32,292 square feet (~3/4 of an acre).
Section 6: Spotting & Aircraft Safety
Aircraft Movement:
Always remember that your skydiving equipment, while incredibly reliable, contains mechanisms designed for rapid deployment. Therefore, keep your movements minimal and deliberate while inside the aircraft. This helps prevent any accidental or premature activation of your skydiving equipment, ensuring a safe ride to altitude for everyone. When you or another person are moving about, always keep your elbows close to your body to protect your handles from snagging.
Wind Direction:
Winds are always described by their direction of origin, stated as a compass heading:
0° or 360° = North
90° = East
180° = South
270° = West
Runway Avoidance:
Avoid landing on runways and taxiways. If you do land on a runway or taxiway, get off it as quickly as possible, as there may be departing or arriving aircraft.
For more on spotting and runway awareness, check out our guide on How to Read Runway Headings.

Additional Resources
Need to review or go deeper? These resources can help:
- Mastering the Parachute Landing Fall (PLF) — The skill that protects you on every landing
- How to Read Runway Headings — Instant orientation at any dropzone
- Beginner Video Playliston YouTube — Review gear terms, equipment, and first jump basics
Ready to Test Your Knowledge?
The Category B quiz covers freefall stability, canopy flight, emergency procedures, and BSRs.
Take the Category B QuizFrequently Asked Questions
What does it mean to "hold a heading"?
Holding a heading means maintaining a consistent direction in freefall. Once you're stable and have your chin up, pick a distinct landmark far out on the horizon — a building, a road, the edge of a town. Avoid using clouds since they move. Keep your eyes on that reference point throughout freefall. If the landmark starts drifting left or right relative to you, you're turning and need to correct. This heading awareness becomes second nature with practice.
What happens if I fail Category B?
You'll repeat the jump. That's it. There's no penalty, no shame — it just means you need more practice on a specific skill before moving forward. Your instructors will debrief you on exactly what to work on, and you'll try again when you're ready. Many skydivers repeat a category at some point in their progression. What matters is that you master the skills, not how many attempts it takes.
What if I don't get to the forward movement or turns?
That's completely fine. Forward movement and 90° turns are bonus maneuvers — nice to practice if everything else is going well, but not required to pass Category B. Your primary objectives are stability, altitude awareness, and completing your practice touches. If you nail those but run out of altitude before trying the bonus skills, you can still pass. You'll have plenty of opportunities to practice movement and turns in later categories.
What if I can't find my deployment handle?
Pause and stay stable. Your instructor is right there — they'll guide your hand to the handle. Don't rush or flail around trying to find it. If for some reason you're alone in freefall and can't locate or pull your handle after two deliberate attempts (about 2 seconds total), initiate your emergency procedures. But in Category B, your instructors have you covered.